Lightning Photo Tips
I used a Nikon print film 35mm SLR camera from the late 1980s then made the move to digital with a Nikon D70 digital SLR
camera in June 2004, and have since had a Nikon D90 and currently a Nikon D7100. I tend to use ISO 100 or 200 for almost all lightning photos, though higher ISO may assist capturing lightning for more distant storms or even help capture elusive phenomena such as sprites and blue jets. For lenses, I tend to favour the Nikkor 50mm AF-S 1.4G as it has precise infinity focus, but also use various wide angle to zoom lenses depending on how close or distant the storm is.
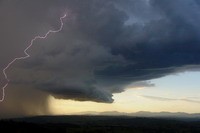
Despite lightning itself being very bright, the more overall
scene light you let in, the better the picture (in most cases), so use lower F
settings at night. Zooming in on distant lightning often produces disappointing
results.
Ideally, for both night and late afternoon / early evening lightning you need
a camera that can be mounted on a tripod and have a cable/remote shutter release.
If you don't have a tripod you can set the camera up on other available surfaces
- eg. a table or car roof. The cable/remote is used to ensure there is no bumping
or shaking of the camera when the shutter button is pressed. If you don't have
a remote another option is to use the camera's self-timer option so that a few
seconds elapse between pressing the shutter and the exposure commencing.
Locking the focus at infinity
You do not want the camera searching for focus when trying to
take pictures of lightning - so you need to set it to infinity first. Any slightly
out of focus shots of lightning are very noticeable with digital.
- Compact Digital Cameras: Most of the compact digital cameras I have come across
have an option to force the focus to infinity - so it is quite easy to lock the
focus at infinity on those cameras - just find it on the menu or in the scenes dial.
- Digital SLRs: Obtaining infinity focus at night with a digital SLR and autofocus
lens is more complicated. To find infinity at night you can use the autofocus
system to try and focus on a distant light source then switch the lens to manual
focus once this is found. An option is to turn your car's lights on, walk some distance away - then focus on those lights. If you cannot get the autofocus mechanism to work you
will have to manually focus the lens. A problem with most autofocus lenses is
that they either have no infinity marker (sideways 8 symbol) or the centre of
the infinity marker is not really infinity! On my Nikkor 18-200mm kens, infinity
is slightly to the right of the infinity mark. A bit of trial and error may be
required. A tip is to experiment with focusing during the day and note where the
autofocus system locates infinity. Another option (which I use) is to obtain an
old manual focus lens that has precise infinity - rotating the focusing ring to
the far left and it is infinity.


|
Lightning Triggers
Lightning Activated Camera Shutter Triggers electronically trigger the shutter of your Nikon, Canon, Olympus, Pentax or Sony digital camera when lightning is detected. The Lightning Strike! Economy and Professional Series are available now.
Visitors of Lightning Photography website will receive a US$5 rebate on the advertised prices for Lightning Strike! triggers. Enter the coupon code of lightning photography in the "add special instructions to the seller" option when you checkout with PayPal.
Around $140 secures you a hot-shoe mounted lightning trigger with camera interface cable and battery.
|
|
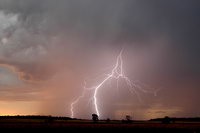
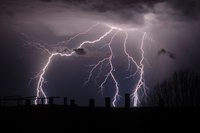
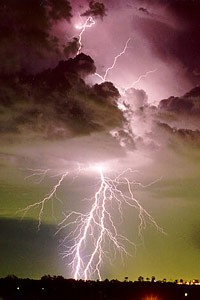
Night Time Lightning Photography
- Set your camera on a tripod.
- Connect a cable shutter release or set the remote for taking the shots.
- Lock focus at infinity.
- Set the shutter speed to bulb 'B' (the shutter will stay open for as long
as you hold it open). If you don't have this option, set the exposure time to
the longest possible - realistically you need 10 to 30 seconds
- Set the aperture (F-stop) to between F2.8 and F5.6. Experiment a little with
different settings but I recommend nothing higher than F8 unless you want many
bolts of lightning to occur in the one photo.
- Frame the picture where the most lightning is occurring, or where the most
spectacular clouds are.
- Observe the lightning for a short while before taking a picture. You will
notice that some cloud to ground (CG) lightning strikes very fast (in a fraction
of a second it has flashed and gone). Other CG bolts strobe or pulse for anything
up to 2 seconds. Sheet lightning (anvil crawlers) sometimes lasts up to a second
or more as it spreads across the sky. If the storm is close to you and/or you
can see it growing or moving, then exposure times should be at most 15 seconds,
or else the cloud will blur (especially if more than one lightning bolt occurs
during the exposure). If the storm is a fair way away, you are only framing the
storm base, or you cannot see it developing or moving, then exposures can be anything
you like! I recommend between 20 seconds and 2 minutes. You can have longer exposure
times for higher F stops.
-
For the 'fast' lightning:
- Press the cable/remote to open the shutter.
- Wait for the lightning (or multiple lightning) to occur within the frame of
your shot.
- Release the shutter.
|
 |
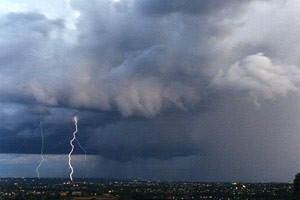 |
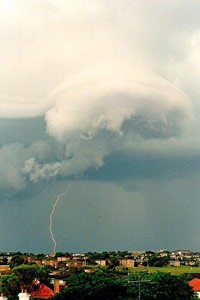
Late Afternoon or Early Morning (low daylight) Lightning Photography
- Set your camera on a tripod.
- Connect a cable shutter release or set the remote for taking the shots.
- Set focus to infinity.
- Set the shutter speed to 'B' if you want to control the length of the exposure,
otherwise I recommend setting the speed to aperture priority setting if you have
this.
- Set the aperture (F-stop) higher (experiment with F5.6 - F16) than for night
shots - it will give you more exposure time, and more chance of capturing the
lightning.
- Frame the picture where the most lightning is occurring, or where the most
spectacular clouds are.
- Either wait for the lightning to occur then press the cable/remote to open
the shutter, or press the cable/remote and hope that lighting occurs reasonably
quickly.
- If you have set the speed to automatic then that's it, otherwise, release
the shutter after your estimated exposure time.
|
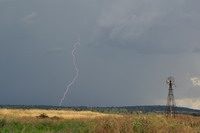
Day Time Lightning Photography
There isn't much to tell you here, you have to react quickly and
be pointing the camera in the right direction. Observe the lightning before you
attempt any shots - if all the bolts are very fast and do not strobe, then you
will not be able to react fast enough.
- Use a normal landscape dial setting, or set the aperture and the exposure
time to what you prefer, as you would with any other day time photograph.
- Lock focus at infinity - you do not want the camera searching for focus before
actually taking the picture
- Aim.
- Wait for the lightning!! If you react quickly enough when you see the bolt,
you may capture it.
Continuous Shooting
There is another technique you can try for lightning photography.
If your camera has a fast continuous shooting mode - you can always just do a
continuous shoot and hope that lightning occurs during that time. It does require
a lot of discarding of images afterwards, but you may be rewarded with a fully
branched daytime CG lightning picture!
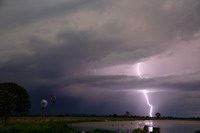
Lightning Triggers
I've had the opportunity to use a lightning trigger the past few thunderstorm seasons. There is no doubt that they will help you capture lightning that you just wouldn't be able to otherwise get. These daytime shots were obtained using a lightning trigger. You use the same photographic techniques described in the daytime and late afternoon tips section, but let the trigger do the work thereafter.
There's usually no need to use a lightning trigger at night as you can use the night time lightning techniques described above which are very effective.
If you don't have access to DSLR camera then you could also capture lightning photos using your mobile phone by downloading these lightning photography apps on your mobile phone (iLightningCam Lite on devices support iOS, lightning Camera apk on Android Phones).
If you have any comments or suggestions or corrections regarding these photo tips, please email Michael Bath.
|
 |
|
|
|